
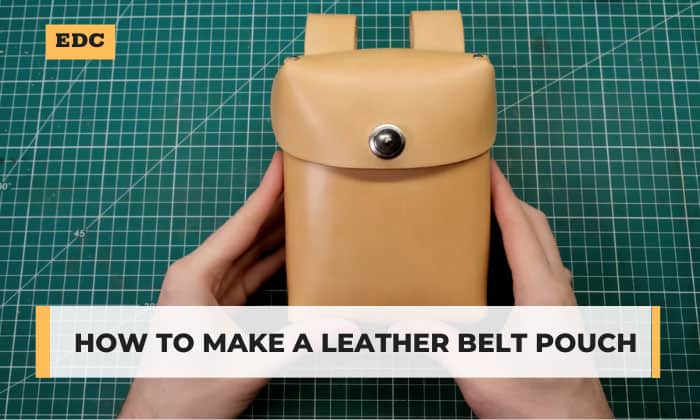
A DIY leather belt pouch is one of the easiest projects for anyone who is in the early stages of their leatherworking journey. However, “easy” does not always mean “quick.” Drying a leather fabric to mold it into your desired shape takes an entire day.
Before you begin, scheme through this guide on how to make a leather belt pouch so you can plan your schedule accordingly. Rest assured, making a leather belt pouch with your own hands can feel rewarding!
Table of Contents
A Step-by-step Guide to Making a Leather Belt Pouch
Tools and Materials For your DIY task
- Printed leather pouch template
- 5 ounces of leather
- Rubber bands
- Your choice of water stain leather dye
- Sam Browne buttons
- Screwdriver
- Press machine, or hammer and hand puncher
- Leather finish
- Leather groover
- Contact cement
- Cutting tools like leather scissors or angled utility cutter
- High-density foam, cotton cloth, or old t-shirt
- Cotton swabs
- Wood or MDF board
- Fiberglass resin
- Pen and pencil
- Alcohol
- Glue gun and glue sticks
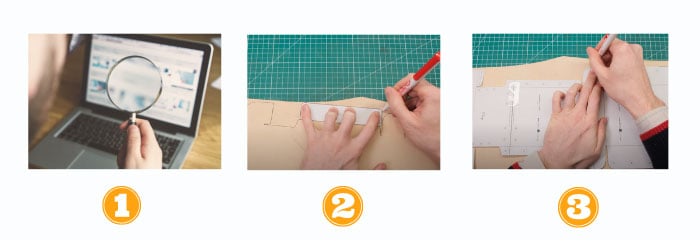
1. Make a template
Option 1: Choose from a plethora of free templates on the Internet.
Use keywords like “leather belt with pocket knife holder,” “bushcraft leather belt pouch” or “men’s leather belt pouch” to find specific designs you want to create.
Option 2: Make your own using illustration apps. You can always improve existing templates and then change the size or add more compartments or secret pockets.
2. Trace the template to the leather
It’s time to cut the template and align each piece onto the rough side of the leather.
Then, trace the template and fold lines on the fabric with a pen. Cut the leather with your leather scissors for thin leather or an angled utility cutter for leather over 5 ounces.
3. Create a mold
You can create cut lines on the wood or MDF board using the height, width, and depth from the printed template of the leather belt pouch pattern.
Then, using a hand saw or jigsaw, chop the wood or MDF board. Make sure to sand the wooden block to smoothen out the surface and remove splinters.
If you’re using MDF boards, be sure to seal it out with 2 coats of fiberglass resin. This will prevent water damage when you wrap wet leather in them.
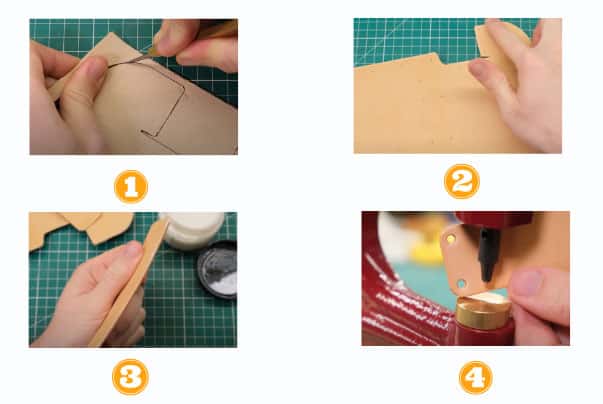
1. Groove the leather pieces
You can carve the fold lines using your leather groover onto the pieces of leather you just cut.
Then, for the side pieces:
- Create the fold lines by tracing the mold with the leather groover.
- Draw a small 45-degree “V” at the bottom of the leather to form a triangle and cut it. This will allow you to fold the fabric without creasing it.
With your transfer lines in place, trace them with your groover again.
- Use a ruler to help you carve straight fold lines on the rough side of the leather.
- Run by the lines with the stitcher or groover at least three times to ensure that they are visible on the clean side of the leather.
- Using your modeling spoon, widen the fold lines.
2. Mold the leather into the wooden or MDF blocks
Fill up one-third of your bucket, basin, or sink with water and half a cup of rubbing (isopropyl) alcohol.
Then, carefully wet the leather pieces to make sure their colors are even when they darken.
Afterward, wrap each soaked leather piece onto the block and attach them securely with rubber bands. When wrapping, place the leather’s clean side faces upward and the rough side faces inward.
Make sure that the rubber bands can hold the leather in place without being too tight that they would leave pressure marks.
3. Rough the smooth surface and start gluing
Step 1: On the smooth side of the leather, sand the parts where you intend to put glue. You can use a portable sander, wire brush, or Dremel tool for this procedure.
Skipping this step will make it harder for the contact cement to glue the two leather fabrics. If you want to make a medieval belt pouch that looks weathered, you can also sand the entire fabric!
Step 2: Then, stick the two sides of the triangle you cut with hot glue.
Apply the contact cement on the surfaces that you want to stick to, ensuring that the edges are covered as well. Since each brand of contact cement comes with different formulas, read the instructions to see if adding thinner is necessary.
With a brush or a plastic spreader, apply the cement evenly on both surfaces.
Then, allow the contact cement to slightly dry then stick the two leather pieces together.
For thicker leather fabrics, lay down the first coat of contact cement then dry it for twenty minutes. Then, coat another layer of contact cement.
Step 3: Press the leather fabrics together with your hands.
Step 4: Clean up the glue residue by sanding it off. Note that the cement takes about 30 seconds to cure. Take advantage of this time to remove the remainder of the adhesive.
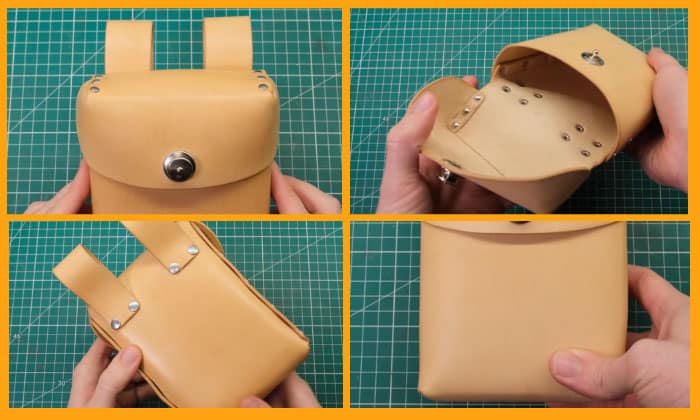
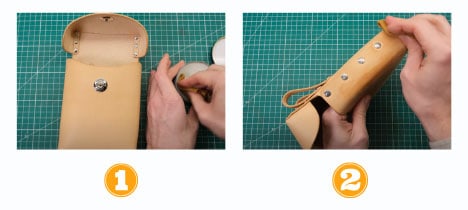
4. Install a Sam Browne button closure
Punch a hole into a leather either using a press machine. Alternatively, use a hand-held puncher and hammer. Either way, ensure that the hole matches the size of your Sam Browne button.
Then, attach the screw from the back of the leather. Put on the button on the other side of the fabric and tighten the screw up with a screwdriver.
Finally, use a slightly smaller puncher to create a tighter hole where the button will go through. You can cut a quarter-inch slit at the bottom of the hole so it’s easier to insert the button. Don’t worry, it will still be able to hold the button securely.
1. Before dyeing
First and foremost, protect your hands with gloves to prevent accidentally dyeing your skin.
Also, choose a well-ventilated area where to perform this task. Even if you’re only using fewer amounts of dye to work on a small belt pouch, the fumes can be irritating.
You should cover your table with a spare rubber mat or dye material that can adequately protect your furniture against the dye.
Now, wipe dust and dirt that accumulated on the leather with a dry rag.
Thin your dye with a dye reducer. Alternatively, use oil to dilute oil-based dyes. Likewise, use water for water-based dyes and alcohol for alcohol-based dyes. And, cover the buttons with tape.
2. Apply the second and third coats
You should dip your soft cloth or high-density sponge into the dye. Then, apply the first coat to the leather in circular motions. If you notice that the sponge or cloth starts to give off a lighter shade, dip it into the dye again. Then, go over the areas that received less dye all the way through the edges.
Then, let the first coating dry.
Next, add another layer of dye by moving the applicator in back-and-forth motions diagonally to the right. Allow the second coating to dry then apply another layer. This time, move the applicator in back-and-forth motions to the left.
You should ensure that the layers of dye are fully dried before you proceed to add the finish.
Then, rub the finish in circular motions with a rag and let it air dry. Buff up the leather with a clean cotton rag.
- Measure the width of the leather belt that you plan to use with the pouch you made.
- Cut the two slits on the pouch, ensuring that they have enough distance to fit both your belt and the belt loop.
- Get another piece of leather and make a strap with a width that will fit through the slits you created. If you want the strap to have the same color as the pouch, use the same dyeing technique above.
- Sand the back of the pouch and the ends of the belt loop.
- Attach the small pouch with a belt loop by inserting the strap’s two ends through the slits. Apply the contact cement and stick them together.
Conclusion
There are many ways to make leather pouches for a belt using different molds, patterns, and techniques. However, starting with a simple design can help you understand the basic principles of the craft.
Indeed, learning how to make a leather belt pouch is just the first step for those who want to pursue leather crafting. But having this skill can come in handy if you like to fabricate your own costumes or sell leather goods.

Veronica is our content editor. She is a talent in delivery. Her main work is editing and writing articles that are both informative and simple to follow. She is in charge of synthesizing our understanding of what personal protection equipment (PPE) is needed in each job, how to best apply it, and how to visualize that equipment.