
Occasionally, the webbings in our bags loosen up and detach from the ladder lock buckle. For those who don’t know, this buckle allows us to tighten, hold tension, or shorten the webbing straps in our bags.
Apart from backpacks, you can also find various equipment used in pet, medical, outdoor, sailing, or military applications. But regardless of the item you’re using, the method for threading and adjusting the webbings in ladder lock buckles only is more or less the same.
Here are two ways how to thread a ladder lock buckle:
Table of Contents
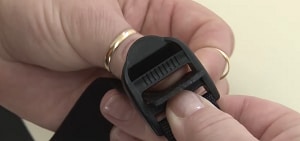
Know About Parts of a Ladder Lock
In other references, the ladder lock is referred to as a “double ladder lock,” “tension lock,” or “webbing adjuster.” Because most backpacks use these buckles, they are sometimes called “loop backpack straps.”
Some of them are made of plastic but you can also find a couple of metal ladder lock buckle designs. Though they come in various shapes and sizes, they share common features:
- Bars – A ladder lock has two bars inside it. Some designs have at least one ribbed bar while others have smooth bars.
- Threading holes – The threading holes are the slots where you can put strap through buckle. A ladder lock has a total of 3 threading holes. In most designs, the slot closest to the tongue is usually tighter than the other two.
- Frame – Like other types of buckles, the ladder lock has a frame. The frame has a straight side and a tongue (definition below) on its opposite side.
Some anti-slip ladder locks have “teeth” inside the frame near the tongue to prevent slipping.
- Tongue – The “tongue” is the rounded end of the frame. In other types, the design looks a bit more like a tongue.
- Straps – With bags or harnesses, there are usually two kinds of straps:
- Fixed strap: A webbing that is attached firmly to an item, e.g. backpack or dog harness.
- Adjustable strap: A webbing that users can shorten or tighten.
Rethreading the Buckle
This two-step process applies to those who need to thread an adjustable strap back to an existing buckle that is already attached to a fixed strap.
What to prepare:
The straps in your bag or any item with a webbing and ladder lock strap adjuster.
Step 1: Insert the straps into the slots
Hold the buckle with your left hand with the right side facing up. With your right hand, place the webbing under the buckle, slide it upward through the middle thread hole, and then pull it.
Next, insert it into the teeth grippers located at the end of the buckle, which, in this case, is the only unused slot left. Then, pull the strap until you achieve the desired length or tightness.
Step 2: Test it
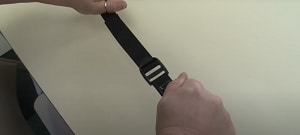
If you’re wearing a bag on your shoulder, the adjustable strap should come undone.
With this in mind, try pulling the two straps on your double ladder lock buckle apart to see if the adjustable one can hold its position.
Threading a Buckle From Scratch
You can use this method to create a bag with a fixed strap and adjustable webbing. This technique is helpful for those who are repairing the bag straps and installing a replacement ladder lock buckle strap.
What to prepare:
- 2 Pieces of synthetic or cotton webbing
- Ladder lock buckle
- Sewing machine
- Lighter or matches
Step 1: Burn the ends of the nylon webbing
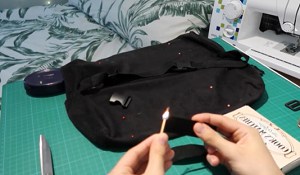
Light your lighter or match and carefully burn the edges of the two nylon webbings until their edges harden.
This way, you can thread a strap through a buckle without fraying it. Plus, it keeps the nylon webbing intact for a long time, especially when you readjust it repeatedly.
Warning: This step does not apply to cotton webbing as it will catch fire. Instead of burning, you can use glue to keep the strands together.
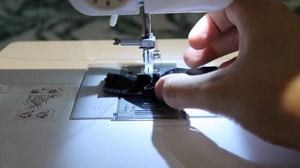
Step 2: Work on the fixed strap
Hold the buckle with the right side facing up. Then, insert the webbing from under the buckle through the slot located immediately after the straight end of the frame.
Drag the webbing upward then slide it into the middle slot. Pull the free end back toward the frame’s straight side.
Ensure that you have ample surface of the webbing to sew onto the item you want to attach it to, e.g. backpacks or harnesses.
Sew the straps using a “Box X” stitch pattern to prevent the buckle from moving up and down.
Step 3: Work on the adjustable strap

To thread a strap adjuster, get the other webbing and feed its end from the underside of the center slot.
Next, drag the webbing upward and insert it into the slot located immediately next to the buckle frame’s tongue.
Lastly, pull the webbing underneath towards the direction of the buckle’s tongue.
Frequently Asked Questions

Can I use the methods above to thread a slide buckle?
Unlike ladder locks, slider buckles come with two slots. Simply fold the webbing in half and insert it through one then over to the other as you would when you thread a backpack strap.
Conclusion
Learning the methods of how to thread a ladder lock buckle can help you in making bags with adjustable straps. Moreover, you can use the same techniques to rethread the straps back into the buckles.
Just feed the webbing into the center slot from underneath, pull it upward, and pass through the slot closest to the tongue. Following the steps we laid out will only take a couple of minutes of your time.

Veronica is our content editor. She is a talent in delivery. Her main work is editing and writing articles that are both informative and simple to follow. She is in charge of synthesizing our understanding of what personal protection equipment (PPE) is needed in each job, how to best apply it, and how to visualize that equipment.